Manage users and agents in your P1 Business Account
P1 user management lets websites' owners and administrators manage the people who work in their Business Account to oversee the content of their fleet of websites. This also covers the AI agents those people use, so access can be granted and revoked for both. Use this guide to add users, assign Business Account roles, update access, and remove users or agents when they no longer need access.
This page focuses on Business Account-level user management. Site-specific permissions, collections, and agent access are managed separately directly in the sites or workstreams.
Before you start
- You must be an administrator for the Business Account you want to manage. Members do not have access to the user-management interface.
- P1 shows users for the current Business Account only. It does not show every P1 user across Pantheon or across other Business Accounts. P1 implements a strong isolation of every customer Business Account.
- A user can belong to more than one Business Account and can switch Business Accounts. Always confirm that you are working in the correct Business Account before changing a user’s access.
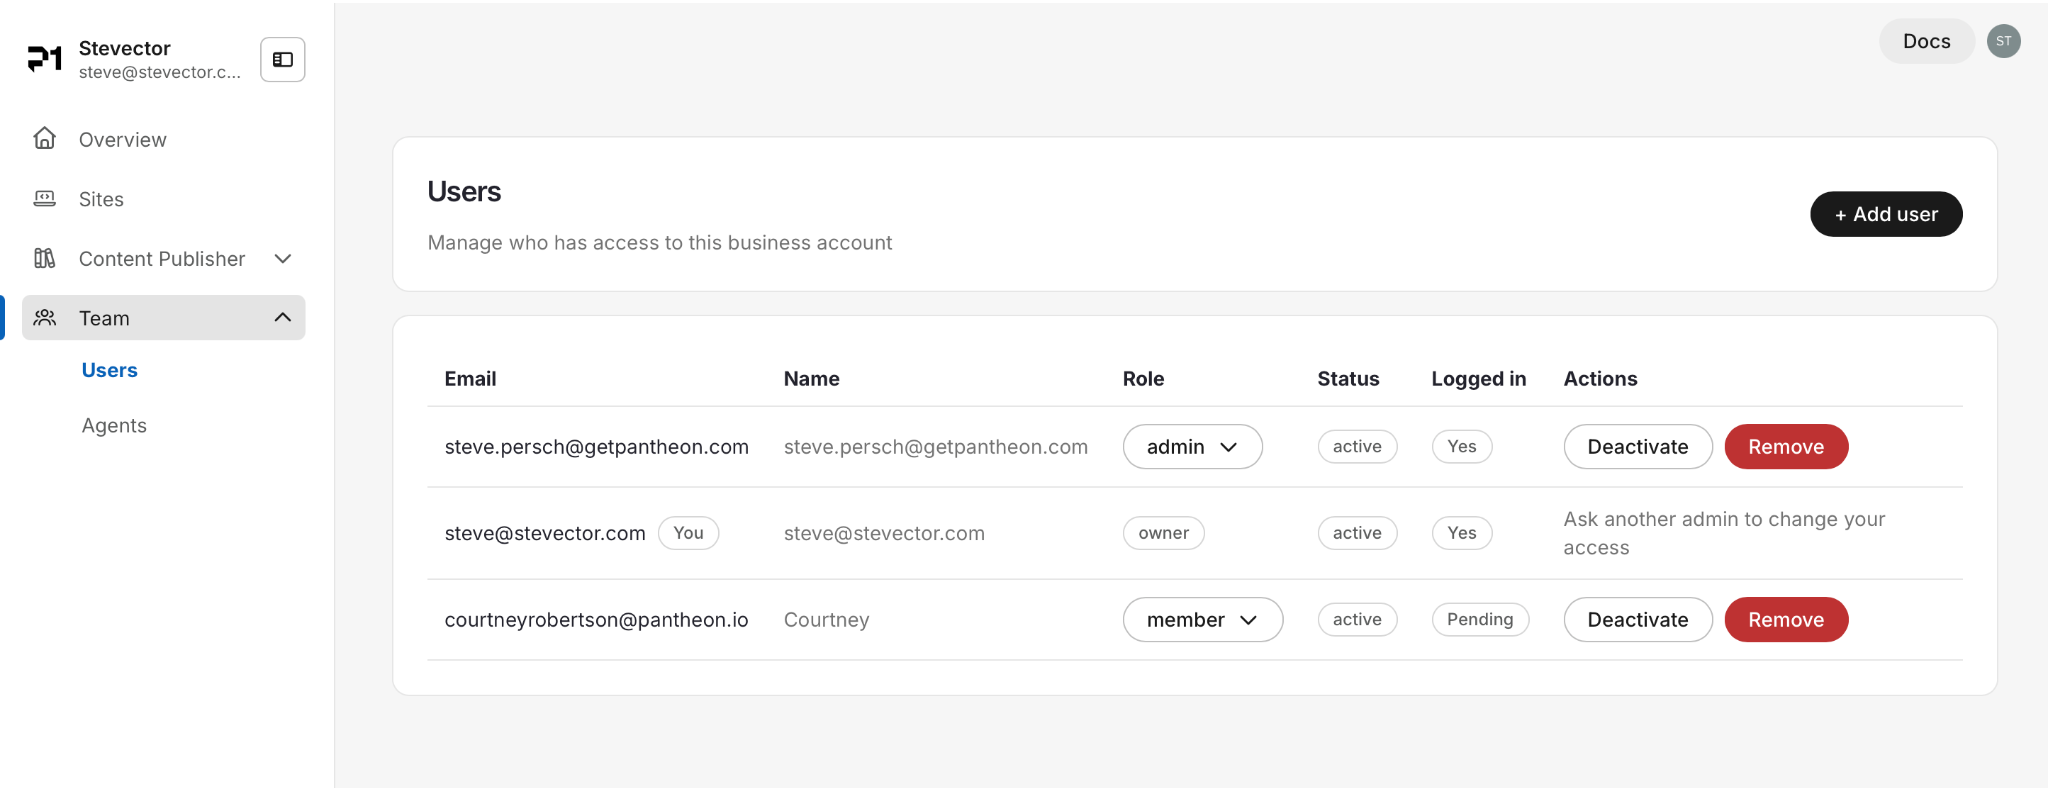
Open your Business Account’s Users page
- Sign in to the P1 dashboard at content.pantheon.io.
- If you are not in the right Business Account (users), use the top left switcher to go in the desired one.
- Select the Business Account you want to manage.
- Open Teams. Go to Users or Agents.
The selected Business Account is the scope for the Users page and for the actions you take there. If you manage more than one Business Account, repeat these steps for each Business Account rather than assuming a change applies everywhere.
Understand the Business Account roles
Role | Use this role for | User-management access |
Admin | People who need to help manage the organization’s P1 users and access | Can open Users and add users, change roles, deactivate users, and remove users |
Member | People who need to work in P1 but should not administer organization membership at large | Cannot access the organization’s user-management interface |
Assign Admin only when a person needs to manage organization membership. Use Member for everyone else who does not need administrative responsibility.
Feature | Admin | Member | Viewer |
Create site | ✅ | ||
Archive site | ✅ | ||
Create workstream | ✅ | ||
Archive workstream | ✅ | ||
View Site structure and settings | ✅ | ✅ | ✅ |
View page in Visual Editor | ✅ | ✅ | ✅ |
Create page | ✅ | ✅ | |
Publish page to live | ✅ | ✅ | |
Delete page | ✅ | ✅ | |
Create / update / archive template | ✅ | ||
Manage pinned component | ✅ | ||
Review workstream | ✅ | ✅ | |
Resolve conflicts | ✅ | ✅ | |
Merge workstream | ✅ | ✅ | |
Add user to Business Account | ✅ | ||
Deactivate user | ✅ | ||
Remove user | ✅ | ||
Add user to site | ✅ | ||
Create site token | ✅ | ||
Revoke site token | ✅ | ||
Create agent | ✅ | ||
Comment (future) | ✅ | ✅ | ✅ |
Add or invite a user
- Open the Users page for the correct Business Account.
- Select Add user or Invite user.
- Enter the person’s email address.
- Select Admin or Member.
- Send the invitation.
- Confirm that the new user appears in the Business Account’s user list.
Invite people with the email address they will use to sign in to Pantheon. An invited user should be associated with the Business Account to which they were invited, rather than creating a separate P1 subscription or Business Account.
If the person already works with another Pantheon Business Account, they can use the same login and switch between the Business Accounts they are authorized to access.
Change a user’s role
- Open the Users page for the correct Business Account.
- Find the user whose role should change.
- Open the row’s actions menu.
- Select the option to edit or change the role.
- Choose Admin or Member.
- Save the change.
Use the lowest-privilege role that supports the person’s responsibilities. Give someone Admin access only when they need to manage users or other Business Account-level administration.
Deactivate a user
Deactivate a user when they should temporarily lose access but may need to return later.
- Open the Users page for the correct Business Account.
- Find the user.
- Open the row’s actions menu.
- Select Deactivate and confirm.
- Reactivate the user when they should regain access, if the reactivation action is available in your account.
For employee leave, temporary contractor pauses, or other short-term access changes, deactivation is preferable to deleting the user because it preserves the Business Account relationship for later restoration.
Remove a user
Remove a user when they should no longer be a member of the Business Account.
- Open the Users page for the correct Business Account.
- Find the user.
- Open the row’s actions menu.
- Select Remove.
- Confirm the removal.
Removing a user from one Business Account does not necessarily remove them from other Business Accounts they belong to. Verify the active Business Account before and after the change.
Keep at least one administrator for the Business Account. Do not remove the last person responsible for administering the Business Account, and do not remove the owner unless your Business Account has another supported ownership path.
Manage agents
Agents are automated users that can act on behalf of your Business Account. They are managed separately from human users so that administrators can review and control their access independently.
Use agents when an integration or automated workflow needs to work with P1 content or a site. Give each agent only the access it needs, and review that access regularly.
P1 Agent
P1 Agent is Pantheon’s first-party agent. It is available by default in every Business Account and is authorized by P1, so administrators do not need to register or invite it like a customer-created agent.
Availability does not mean that every Business Account can use every P1 Agent capability. Each Business Account may be entitled—or not entitled—to specific P1 Agent functionality or usage. Your Business Account’s entitlements determine what the P1 Agent can do for that Business Account.
P1 Agent is managed differently from customer-created agents:
- P1 controls its authorization and default availability.
- Business Account entitlements control which P1 Agent capabilities or usage are available.
- Administrators should not create duplicate agents for capabilities already provided by P1 Agent.
- Customer-created agents continue to require their own registration, access scope, and credentials.
Add or register an agent
- Open Teams for the correct Business Account.
- Go to Agents.
- Select Add agent or Register agent.
- Enter a name that clearly identifies the agent and its purpose.
- Select the site or other scope where the agent should work.
- Select the minimum access the agent needs.
- Save the agent.
Agents should have their own identity and credentials. Do not share a person’s login or API key with an agent, and do not share an agent’s key between multiple agents.
Manage agent access
- Review the sites and permissions assigned to each agent.
- Disable or suspend an agent when it should stop working temporarily.
- Remove an agent when it is no longer needed.
- Update an agent’s access when its purpose or scope changes.
Agent access is separate from a person’s Admin or Member role. Giving someone Admin access does not automatically give an agent access to the same sites, and creating an agent does not give a person additional access.
Manage agent keys
If P1 provides a key when you register an agent, store it securely and treat it like a password.
- Generate a new key only when needed.
- Never place an agent key in source code, documentation, tickets, or chat messages.
- Revoke a key immediately if it may have been exposed.
- Disable or remove the agent when the integration is retired.
Recommended agent review
For each agent, keep a record of its owner, purpose, sites, permissions, and key rotation or expiration plan. Review this information regularly and remove agents that are no longer used.
Recommended operating procedures for IT and administrators
Onboarding
- Add the person to the correct Business Account.
- Start with the Member role unless administrative access is required.
- Give Admin access only to people who need to manage Business Account membership.
- Ask the new user to sign in with the email address that received the invitation.
- Confirm that the user can access the intended P1 site or workflow.
Role changes
- Review whether the person needs Business Account administration or only day-to-day P1 access.
- Change Admin users to Member when their administrative responsibilities end.
- Review site-specific access separately when a person changes teams or responsibilities.
Offboarding
- Deactivate the user promptly when access should stop temporarily or while the offboarding decision is being completed.
- Remove the user when they should no longer belong to the Business Account.
- Check other Business Accounts if the person works with multiple Business Accounts.
- Confirm that another administrator remains after the change.
Agencies and multi-Business Account users
- Select the customer’s Business Account before managing that customer’s users.
- Treat each Business Account as a separate administrative boundary.
- Do not assume that a user’s role in one Business Account grants the same role in another Business Account.
Troubleshooting
I do not see Users
You may be viewing the wrong Business Account, or you may be a Member rather than an Admin. Switch to the intended Business Account and confirm that your account has an administrative role.
I cannot find a user when assigning access
P1 scopes user visibility to the current Business Account. Confirm that you selected the correct Business Account and that the person has been added to it. Users who belong only to another Business Account should not appear in the current Business Account’s user list.
The invited user is prompted to create a new Business Account
The invitation should associate the person with the Business Account that invited them. Confirm that they are signing in with the invited email address and that they opened the invitation intended for your Business Account. If the user is still routed to create a separate Business Account, contact your Pantheon administrator or support team.
A user belongs to multiple Business Accounts
Use the Business Account switcher to select the Business Account the user should work in. Manage the user’s role separately in each Business Account where they have access.
Summary
Use the Business Account switcher to select the Business Account you want to manage, then use its Users page to add users, assign Admin or Member roles, deactivate access, or remove users. Keep Business Account boundaries in mind: user lists and changes are scoped to the active Business Account.