Overview
The P1 MCP Server enables AI assistants like Claude to read, edit, and manage content in P1 and more specifically in P1 Collaborative Content Repository (CCR).
P1 MCP Server is a remote hosted MCP. This remote deployment model ensures your AI assistants always have access to the latest tools and features, without the friction of running a local server or manual updates. You can access it at mcp.p1.pantheon.io/mcp (and at staging.mcp.p1.pantheon.io/mcp for staging purposes)
P1 MCP Server Authentication uses OAuth 2.0 with your existing Pantheon account. No API keys are required. This guide covers setup for Claude Desktop and Claude Code, explains the available tools, and walks through common workflows.
Prerequisites
• A Pantheon account with access to at least one P1 site
• Claude Desktop (v1.0+) or Claude Code or any agentic client supporting MCP remote access over http.
Authentication modes
Using your own (human) user credentials
You can simply authorize your favorite AI assistant to act on your P1 account on your behalf. For that, you’ll simply authenticate your assistant with your user credentials. This is perfectly suited when using tools such as Claude Desktop.
Examples on how to set it up:
Claude Desktop Setup
1. Click on your user account at the bottom left of Claude.
2. Access the Settings menu and then the Connectors sub menu.
3. Click add a connector, enter mcp.p1.pantheon.io/mcp the URL for the P1 MCP and save.
4. Name it Pantheon P1
Note: if you use Claude Enterprise, this might have to be done by your administrator, the Connector would then be available in the Browse Connector section.
5. Authorize Claude to use the Pantheon MCP Server.
6. You should now see Pantheon P1 in the list of Claude Connectors.
7. You can test to see that it’s working by asking Claude about its P1 powers.
Cursor Setup
1. In cursor main menu, go to Cursor and then Cursor Settings
2. Click on Tools & MCP.
3. Click Add Custom MCP (if you do not have any MCP Servers installed) or New MCP Server (if you already have at least one).
4. Edit the mcp.json configuration file as below and save.
{
"mcpServers": {
"P1": {
"url": "https://mcp.p1.pantheon.io/mcp"
}
}
}
5. Back on the Tools & MCP screen, click Connect to authorize the Pantheon P1 app.
6. You will have a list of capabilities to show that it is working.
Using a dedicated agent key
You can also create an agent key with dedicated role and permission, to whom you or others will grant access rights to websites or workstreams. This is typically what you would use when building autonomous agents to whom you delegate bigger tasks.
Setup
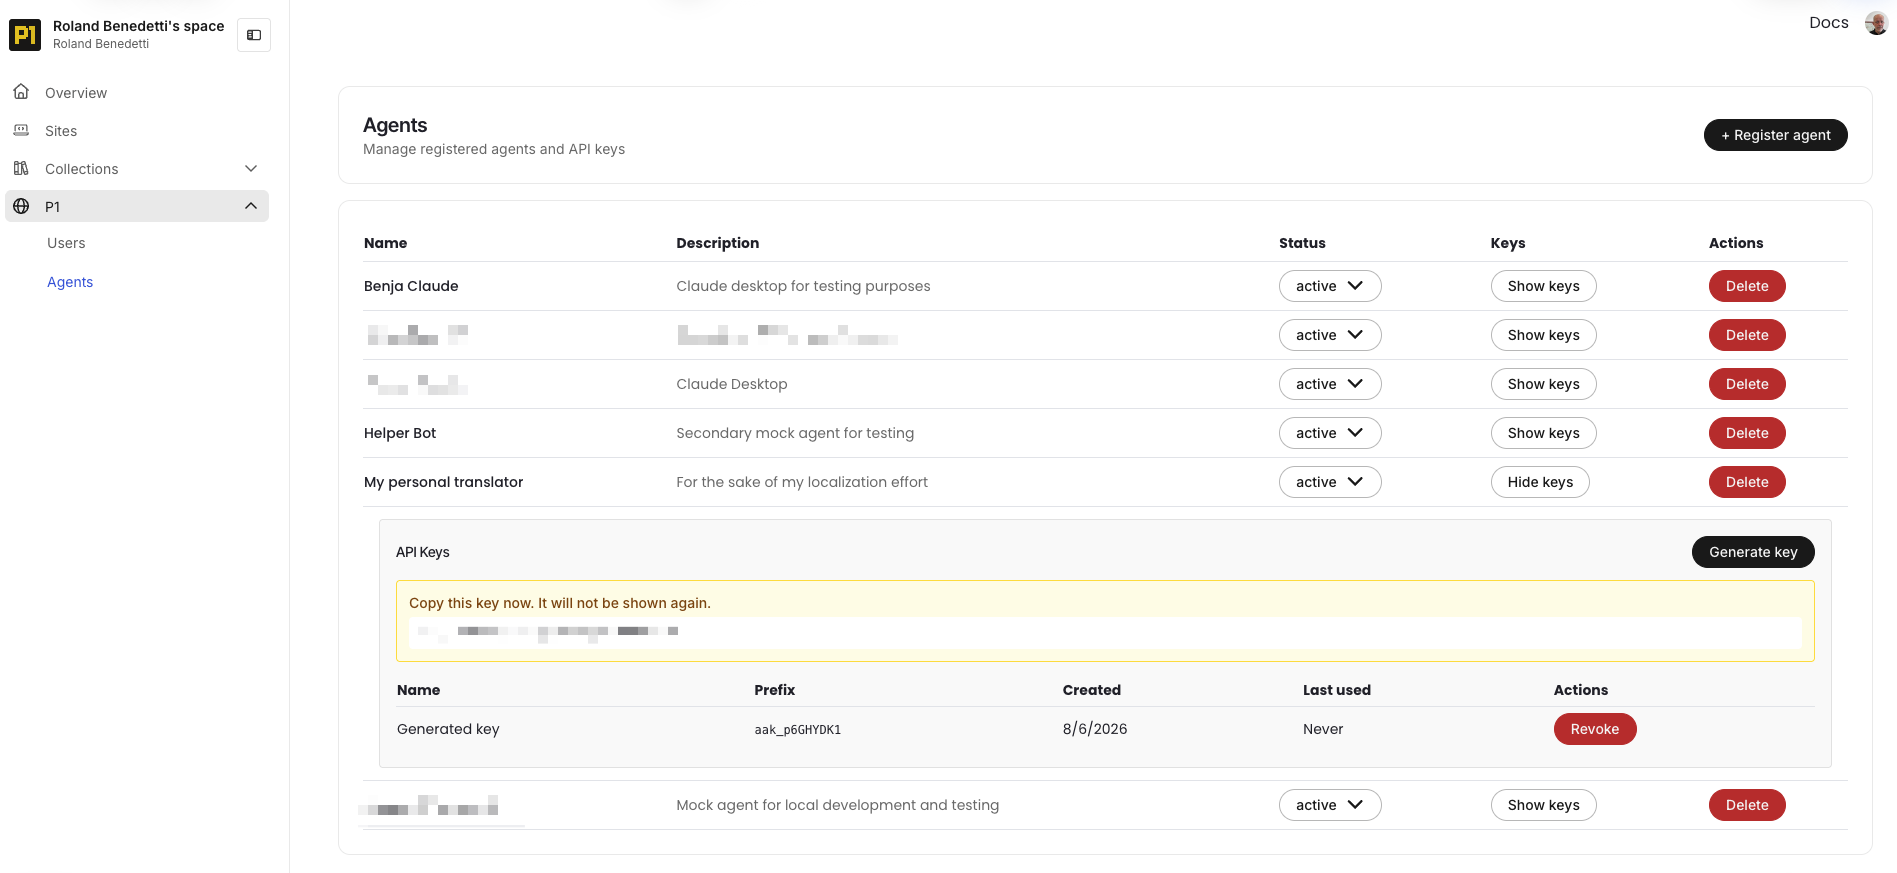
- Create a dedicated agent key in P1 dashboard, navigate to P1, agent dashboard. (https://content.pantheon.io/dashboard/p1/agents),
- Click register agent, give your agent a name and description and register it.
- Click on show keys, generate a key, copy it before hiding it (you won’t see it again)
- Use it to configure your AI agent.
- Example of configuration for Claude Code
"mcpServers": {
"p1-agent": {
"type": "http",
"url": "https://staging.mcp.p1.pantheon.io/mcp",
"headers": {
"X-API-Key": "${YOUR_AGENT_API_KEY}"
}
}
}
}
For other MCP clients, just ask your favorite LLM to help you, installation will be similar.
Available Tools
The MCP server exposes most of the P1 API endpoint as tools organised into three groups.
See below the non-exhaustive list.
Discovery
- list_sites — List all sites you have access to. Always start here to get site UUIDs.
- list_branches — List branches for a site. Every site has a main branch (marked [default]). Use branch UUIDs in subsequent calls.
- list_documents — List all documents in a branch, returning paths (e.g. /home, /about) and IDs.
- list_components — List Puck components registered in a site's component registry. Use before create_page to discover available types.
Reading Content
- get_document — Fetch the full content of a document or a specific region. Always call this before editing to understand the current structure.
Editing Content
- check_edit_permission — Verify no one else is editing the regions you plan to change. Call before start_edit_session.
- start_edit_session — Reserve document regions and create a rollback checkpoint. Requires a prior get_document call.
- apply_document_edits — Apply edits within an active session. Use dot-notation paths (e.g. content.0.props.title), not JSON Pointer format.
- complete_edit_session — Save changes and close the session. Always call this when done.
- abort_edit_session — Roll back all changes and close the session. Use when something goes wrong.
Collaboration
- get_branch_presence — See who is currently viewing or editing across a branch.
- get_document_presence — See who is viewing or editing a specific document, including their focus regions.
Content Creation
- create_page — Create a new page with a set of Puck components. Use list_components first to discover available types.
- create_branch — Create a new branch for isolated work. Edits on a non-main branch don't affect the live site until published.
Typical Workflows
Editing an Existing Document
1. list_sites → find your site_id
2. list_branches → find or confirm the branch
3. list_documents → find the document path
4. get_document → read current content
5. check_edit_permission → confirm no conflicts
6. start_edit_session → reserve regions
7. apply_document_edits → make changes
8. complete_edit_session → save
Creating a New Page
1. list_sites + list_branches → identify target
2. list_components → discover available component types
3. create_page → create the page with chosen components
Starting New Work on a Branch
1. list_branches → confirm the branch name is not already in use
2. create_branch → create the branch (lowercase-kebab name, e.g. draft-hero-rewrite)
3. Proceed with editing tools, referencing the new branch_id
MCP URL
- Production: https://mcp.p1.pantheon.io/mcp
- Staging: https://staging.mcp.p1.pantheon.io/mcp
Troubleshooting
Tool not found — Claude Desktop caches the tool list. Restart to pick up the latest tools.
409 Branch already exists — list_branches to confirm the name, then choose a unique name.
Authentication required from tools — Your session token may be expired (1-hour Auth0 token TTL). Restart Claude Desktop to re-authenticate.